Add Stripe to your .NET project to accept online payments
Published: Monday 24 June 2024
Stripe is one of the most popular online payment providers that can be integrated into web applications.
Sign up for a Stripe account
The first thing that you'll need to do is to sign up for a Stripe account.
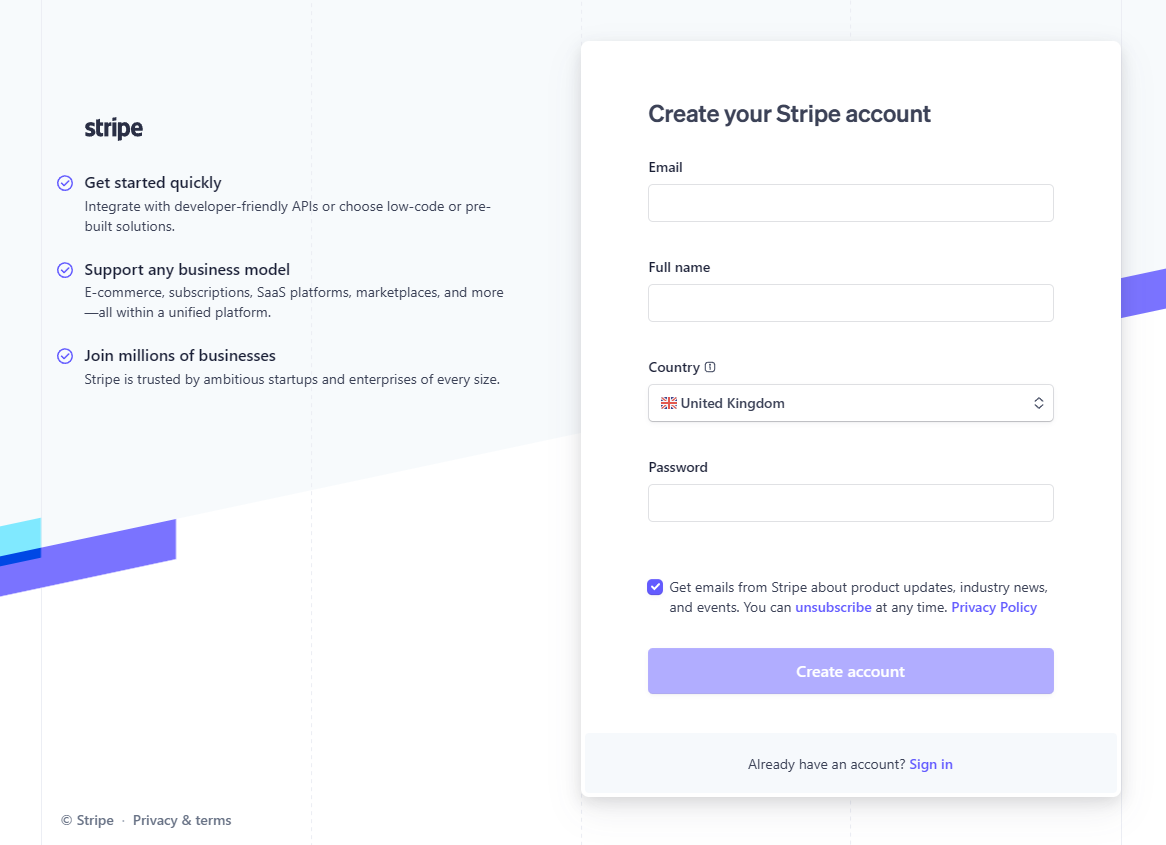
Sign up for a Stripe account
Once signed up, you'll have to verify your email address and go through additional steps to activate payments on your account.
- Verifying your business
- Adding your bank details (so you get paid)
- Securing your account with two-step authentication
- Tax calculation
This video gives an excellent walkthrough of the steps you need to take to set up your Stripe account.
The front-end application
We are going to set up an ASP.NET Core Web API that will be able to accept Stripe online payments.
wwwroot folder, we are going to add these lines to Program.cs.
// Program.cs
...

var app = builder.Build();

...

app.UseDefaultFiles(); // <-- Add this line
app.UseStaticFiles(); // <-- Add this line

...

app.Run();
We'll include a static index.html file that will be in the wwwroot folder. This will reference a JavaScript file called stripe.js that has an onclick event listener to make a Web API call to our web application.
document.location.href to redirect the user to Stripe.
confirmation.html page.
The product page
On our product page, we are offering Beats Flex Wireless Earphones for US$49.99. Stripe requires you to enter an email address, so we've provided a field and a button to buy the product.
<!-- index.html -->
<!DOCTYPE html>
<html>
<head>
    <meta charset="utf-8" />
    <title>Buy our products</title>
    <link rel="stylesheet" href="https://cdn.jsdelivr.net/npm/bootstrap@4.0.0/dist/css/bootstrap.min.css" integrity="sha384-Gn5384xqQ1aoWXA+058RXPxPg6fy4IWvTNh0E263XmFcJlSAwiGgFAW/dAiS6JXm" crossorigin="anonymous">
</head>
<body>
    <div class="container">
        <div class="row">
            <div class="col-12">
                <h1>My shop</h1>
                <div class="container">
                    <div class="row">
                        <div class="row-12">
                            <h3>Beats Flex Wireless Earphones</h3>
                            <p>The Beats Flex Wireless Earphones offer a comfortable and versatile audio experience. With magnetic earbuds and up to 12 hours of battery life, they are ideal for everyday use.</p>
                            <p>USD 49.99</p>
                            Email: <input type="text" name="Email" />
                            <button class="btn btn-primary" type="submit" data-buy="1">Buy</button>
                        </div>
                    </div>
                </div>
            </div>
        </div>

    </div>
    <script src="/js/stripe.js"></script>
</body>
</html>
Set up a product page to accept online payments with Stripe
The Buy button on the page has an attribute called data-buy with a value of 1. We'll target this attribute to make an onclick event listener and make the API call.
/js/stripe.js.
The onclick event listener to make the API call
First, we'll check that the [data-buy] has a value to it and that it's a valid number. We are going to use this number as the product ID.
data-buy button which is a div element. This contains the email address input that will be part of the body in the API call.
/api/stripe using JSON.
document.location.href to the redirectUrl object property that will be contained in the JSON.
// /js/stripe.js
document.querySelector('[data-buy]').addEventListener('click', async (event) => {
    if (event?.target?.getAttribute('data-buy') != '') {
        var productId = Number(event.target.getAttribute('data-buy'));

        if (isNaN(productId)) {
            throw 'Not a valid product';
        }

        var parentNode = event.target.parentNode;
        var email = parentNode.querySelector(`input[name='Email']`).value;

        await fetch('/api/stripe', {
            method: 'POST',
            headers: {
                'Content-Type': 'application/json'
            },
            body: JSON.stringify({ productId: productId, email: email })
        })
        .then(async(response) => {
            if (response?.ok) {
                var json = await response.json();

                document.location.href = json['redirectUrl'];
            }
        });
    }
});
The confirmation page
Finally, we'll set up a basic confirmation page called confirmation.html. This will contain a message saying that the order has been received.
<!-- confirmation.html -->
<!DOCTYPE html>
<html>
<head>
    <meta charset="utf-8" />
    <title>We have received your order</title>
    <link rel="stylesheet" href="https://cdn.jsdelivr.net/npm/bootstrap@4.0.0/dist/css/bootstrap.min.css" integrity="sha384-Gn5384xqQ1aoWXA+058RXPxPg6fy4IWvTNh0E263XmFcJlSAwiGgFAW/dAiS6JXm" crossorigin="anonymous">
</head>
<body>
    <div class="container">
        <div class="row">
            <div class="col-12">
                <h1>Thank you</h1>
                <div class="container">
                    <div class="row">
                        <div class="row-12">
                            <p>We have received your order.</p>
                        </div>
                    </div>
                </div>
            </div>
        </div>
    </div>
</body>
</html>
The Web API
Before we set up the Web API endpoint, we need to create a couple of models.
BuyModel class will have data from the request body that we are sending such as the product ID and the email address. To ensure these fields are validated, we'll add data annotations to them ensuring the properties are required, and that the email address is a valid one.
// BuyModel.cs
public class BuyModel
{
    [Required]
    public int ProductId { get; init; }

    [Required, EmailAddress]
    public string Email { get; init; }
}
In-addition, we'll create a ProductModel class. This will contain details about the product, such as the ID, name and price.
// ProductModel.cs
public class ProductModel
{
    public int Id { get; }

    public string Name { get; }

    public decimal Price { get; }

    public ProductModel(int id, string name, decimal price)
    {
        Id = id;
        Name = name;
        Price = price;
    }
}
The Stripe API key
There is one other class that we need to create. The StripeOptions class will contain the API key from our Stripe account. This is so we are able to create an Stripe checkout session, and redirect the user to the Stripe payment page.
// StripeOptions.cs
public class StripeOptions
{
    public string? ApiKey { get; init; }
}
How to get the Stripe API key
Log in to your Stripe account and in the top-right hand corner, ensure that Test mode is turned on. This ensures that only test payments are made and that no real money changes hands.
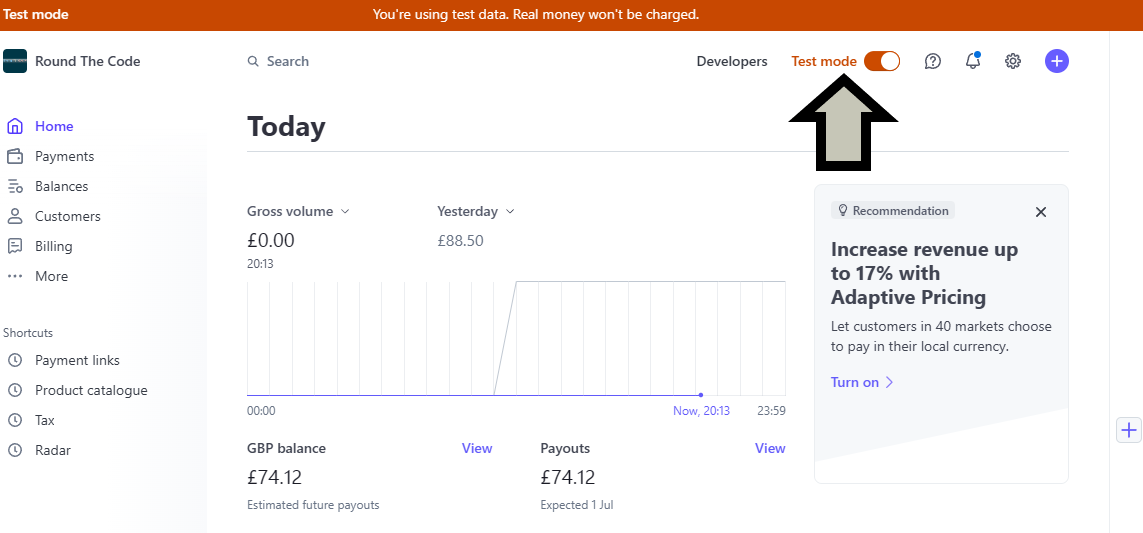
Turn on Test mode in your Stripe account
Afterwards, click on the Developers link to the left-hand side of it.
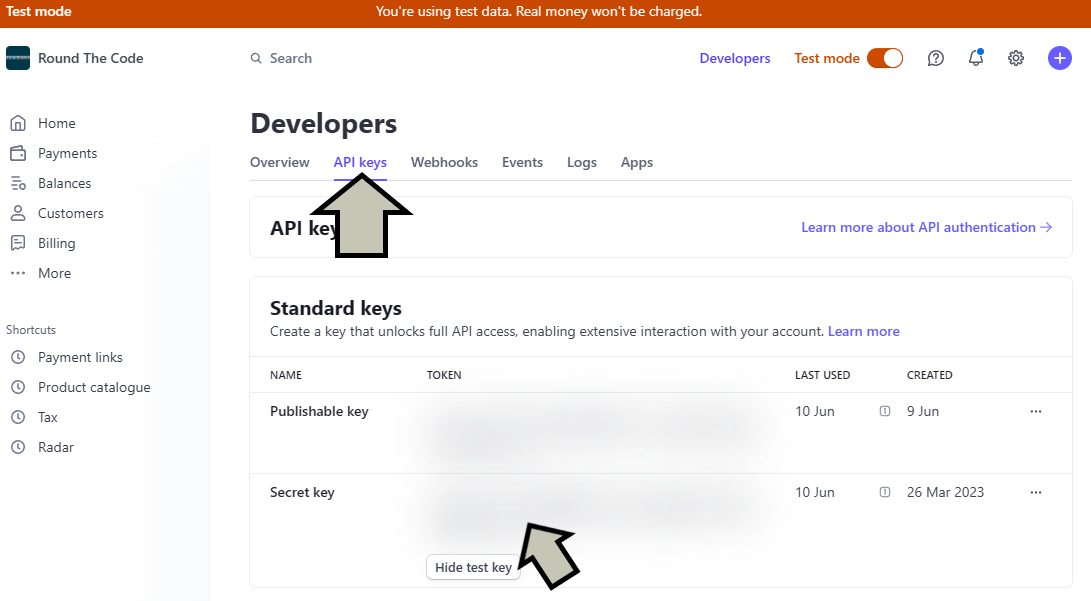
Get the Secret key from Stripe to integrate online payments
Paste the Stripe API key into your appsettings.Development.json file inside the Stripe:ApiKey key.
{
  "Logging": {
    "LogLevel": {
      "Default": "Information",
      "Microsoft.AspNetCore": "Warning"
    }
  },
  "Stripe": {
    "ApiKey": "API_KEY_HERE"
  }
}
To ensure that we can read the API key from the appsettings.Development.json file, we need to add it to the StripeOptions class.
Program.cs before builder.Build() is called.
// Program.cs
var builder = WebApplication.CreateBuilder(args);

// Add services to the container.

...

builder.Services.AddOptions<StripeOptions>()
    .Bind(builder.Configuration.GetSection("Stripe")); // <-- Add this line

var app = builder.Build();

...

app.Run();
Nuget package
Stripe has extensive documentation on how to use the API.
The Web API controller
It's now time to create the Web API controller called StripeController.
ProductModel field called DefaultProduct. This will contain details about the product.
StripeOptions through dependency injection.
// StripeController.cs
[Route("api/[controller]")]
[ApiController]
public class StripeController : ControllerBase
{
    private readonly ProductModel DefaultProduct
        = new(1, "Beats Flex Wireless Earphones", 49.99m);

    private readonly StripeOptions _stripeOptions;

    public StripeController(IOptionsSnapshot<StripeOptions> stripeOptionsValue)
    {
        _stripeOptions = stripeOptionsValue.Value;
    }
}
Next, we'll create the endpoint. It will be called BuyAsync and we'll pass in a BuyModel instance as the parameter so we know the product ID and email address. As well as that, we'll add the HttpPost attribute to it.
ModelState is valid and that the ID in the request body is the same as the default product ID.
StripeConfiguration class that is in the Stripe namespace, and add the key to the ApiKey property.
StripeSession and these are the details to include:
Mode= paymentClientReferenceId= A unique reference for the sessionSuccessUrl= The full URL (including the origin) to redirect the user if they make a successful paymentCancelUrl= The full URL (including the origin) to redirect the user back if they cancel the paymentCustomerEmail= The customer's email addressLineItems= Information about product such as the price and quantity
Finally, we'll return the URL in the response to redirect the user to the Stripe payment screen.
// StripeController.cs
[Route("api/[controller]")]
[ApiController]
public class StripeController : ControllerBase
{
    private readonly ProductModel DefaultProduct
        = new(1, "Beats Flex Wireless Earphones", 49.99m);

    private readonly StripeOptions _stripeOptions;

    public StripeController(IOptionsSnapshot<StripeOptions> stripeOptionsValue)
    {
        _stripeOptions = stripeOptionsValue.Value;
    }

    [HttpPost]
    public async Task<IActionResult> BuyAsync(BuyModel buyModel)
    {
        if (!ModelState.IsValid)
        {
            return BadRequest();
        }

        if (buyModel.ProductId != DefaultProduct.Id)
        {
            return BadRequest();
        }

        var product = DefaultProduct;
        var origin = $"{Request.Scheme}://{Request.Host}";

        StripeConfiguration.ApiKey = _stripeOptions.ApiKey;

        // Create Stripe checkout session
        var stripeSessionService = new SessionService();

        var stripeCheckoutSession = await stripeSessionService.CreateAsync(new SessionCreateOptions
        {
            Mode = "payment",
            ClientReferenceId = Guid.NewGuid().ToString(),
            SuccessUrl = $"{origin}/confirmation.html",
            CancelUrl = $"{origin}/index.html",
            CustomerEmail = buyModel.Email,
            LineItems = new List<SessionLineItemOptions>
            {
                new SessionLineItemOptions()
                {
                    PriceData = new SessionLineItemPriceDataOptions()
                    {
                        Currency = "USD",
                        ProductData = new SessionLineItemPriceDataProductDataOptions
                        {
                            Name = product.Name,
                        },
                        UnitAmountDecimal = product.Price * 100
                    },
                    Quantity = 1
                }
            }
        });

        return Ok(new { redirectUrl = stripeCheckoutSession.Url });
    }
}
When the user is redirected to Stripe
When the user has entered their email address and pressed the Buy button, they're redirected to the Stripe payment screen.
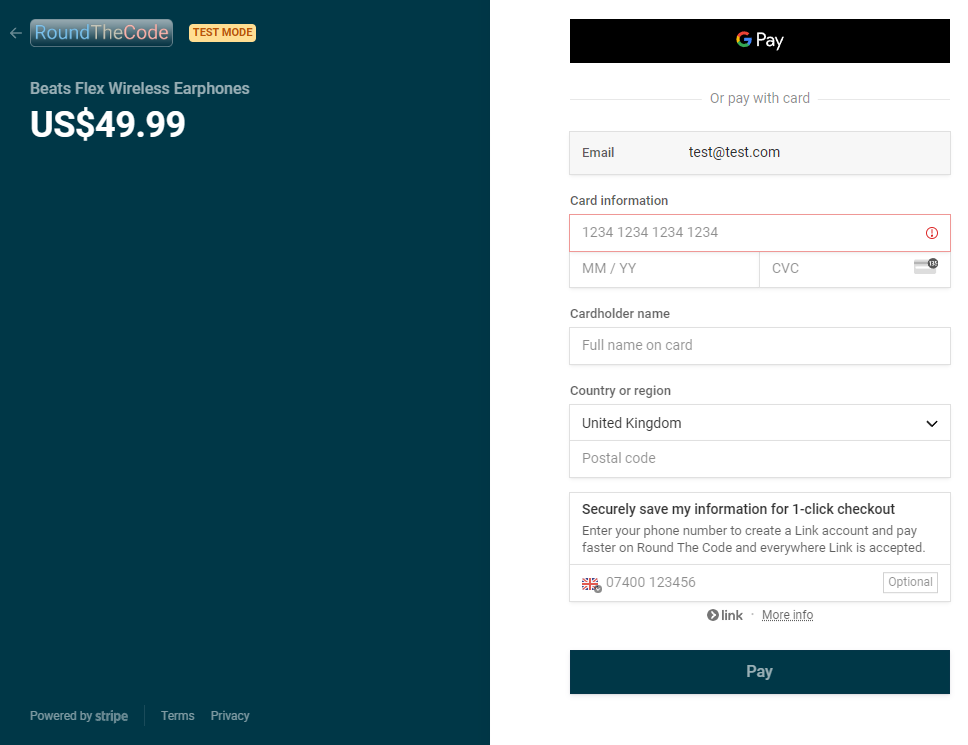
Make an online payment on your .NET project with Stripe
Once they've made a successful payment, the user will be redirected back to the confirmation page that we created earlier.
Confirmation page on .NET project after successful payment on Stripe
Start accepting live payments
When you are ready to start accepting live payments, you'll need to add a different Stripe API key to your .NET project.
Watch the video
Watch the video where we talk you through how to set up your ASP.NET Core Web API to accept Stripe payments.
Latest tutorials

