- Home
- .NET tutorials
- Why Blazor Wasm is the best choice for API integration
Why Blazor Wasm is the best choice for API integration
Published: Monday 31 August 2020
There are many reasons why Blazor WebAssembly (or Blazor Wasm) is the best choice for API integration. It's lightweight. It works offline. And my personal favourite, you can code the integration in C#.
But then there are many other frameworks out there where it's just as easy to integrate an API. Why choose Blazor Wasm over the other frameworks?
Why use Blazor Wasm for API Integration?
The way Blazor Server works (the other Blazor hosting model) is that you have a constant connection between the client and server through SignalR.
But what if your internet connection drops for a few seconds? With Blazor Server, you lose your connection between the server making your application useless.
No such issue with Blazor Wasm. As you don't need a constant connection between the server and the client, your internet dropping out for a few moments ain't going to be the end of the world.
And then there's the ability to code in C#. If you use many of the JavaScript frameworks out there such as React or Angular, you would have to integrate the API in their coding language.
Now I don't know about you, but I always find that I have to use Google to remember the syntax for a JavaScript library. That is wasting my valuable time, something that we are all short of. I would much rather get the job done quicker, and go off and do something else.
In addition, Blazor Wasm is lightweight! It downloads the application into your browser loading in the DLL's and that's it! It doesn't have to do anything else, making it a top performer.
How to Integrate API Integration Into Blazor Wasm?
Now that I've shared with you the many reasons to integrate an API into a Blazor Wasm, it's time to see how we can go ahead and implement it.
Don't we need to Build the API First?
Spot on! We need to build the API.
Now, we could start from scratch, but there's no need. We already built one up in my article "Create CRUD API Endpoints with ASP.NET Core & Entity Framework". If you wish to follow along at home, I recommend you read through the article and watch the tutorial as we are going to use the same API in this example.
We will also use the Team CRUD API endpoints in this article and will use them to build a CRUD Team module in our Blazor Wasm application.
In addition, we need to remember to set CORS in our API. Again, I recommend you read "Getting Started with CORS in ASP.NET Core" to familiarise yourself with CORS, but basically, you need to configure the API to allow traffic from a Blazor Wasm application.
For the purposes of this demonstration, the API will run on https://localhost:2001 and the Blazor Wasm application will run on https://localhost:2002.
How to Create in a Blazor Wasm?
Time to create a Razor component in our Blazor Wasm application. We will call it Create.razor.
This is where we populate a form with our Team entity, which includes name, shirt colour and location.
When we submit the form, it fires a POST request to the API and returns the full entity back, including the ID as a response.
From there, it redirects the user to the read page which we will create next.
@using System.Net.Http
@page "/teams/create"
@inject HttpClient httpClient
@inject NavigationManager navigationManager
<h1>Create a Team</h1>
<form @onsubmit="Submit">
	<label for="Name">Name</label>
	<input type="text" name="Name" @bind="Name" /><br />
	<label for="ShirtColour">Shirt Colour</label>
	<input type="text" name="ShirtColour" @bind="ShirtColour" /><br />
	<label for="Location">Location</label>
	<input type="text" name="Location" @bind="Location" /><br />
	<button type="submit">Create Team</button>
</form>
@code {
	public virtual string Name { get; set; }
	public virtual string ShirtColour { get; set; }
	public virtual string Location { get; set; }

	public async Task Submit(EventArgs eventArgs)
	{
		var payload = new { Name, ShirtColour, Location };

		var response = await httpClient.PostAsJsonAsync("https://localhost:2001/api/team", payload);

		if (response.IsSuccessStatusCode)
		{
			var team = await response.Content.ReadFromJsonAsync<Team>();

			navigationManager.NavigateTo("/teams/read/" + team.Id);
		}
	}
}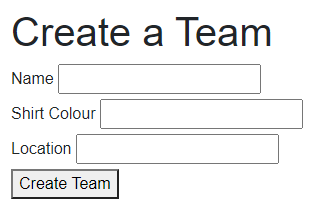
Creating a team in Blazor Wasm using an API
What about Reading a Record in Blazor Wasm?
Again, we need to create a Razor component. That's call it Read.razor.
This will display all the information about the team by passing in a particular ID. The ID is set in the endpoint, and we need to capture it by creating a property of type integer, marking it with a [Parameter] attribute.
In addition, we need to override the OnParametersSetAsync method. In here, we will call the read API method to get the information about that particular team. This will be set in another property called Team.
Lastly, we need to populate the information based on the instance of Team. We will show this to the user, but only when the Team is populated. As there is a delay between the Razor component loading and the OnParametersSetAsync method running, it will throw an error if there isn't an instance check on Team.
@page "/teams/read/{id:int}"
@inject HttpClient httpClient
@inject NavigationManager navigationManager

<h1>Viewing Your Team@((Team != null ? " - " + Team.Name : ""))</h1>
@if (Team != null)
{
	<h2>Details</h2>
	<ul>
		<li>Id: @Team.Id</li>
		<li>Name: @Team.Name</li>
		<li>Shirt Colour: @Team.ShirtColour</li>
		<li>Location: @Team.Location</li>
	</ul>
	<h2>Actions</h2>
	<ul>
		<li><a href="/teams/update/@Team.Id">Update</a></li>
		<li><a href="/teams/delete/@Team.Id">Delete</a></li>
	</ul>
}

@code {
	[Parameter]
	public virtual int Id { get; set; }

	public virtual Team Team { get; set; }

	protected override async Task OnParametersSetAsync()
	{
		Team = await httpClient.GetFromJsonAsync<Team>("https://localhost:2001/api/team/" + Id);
	}
}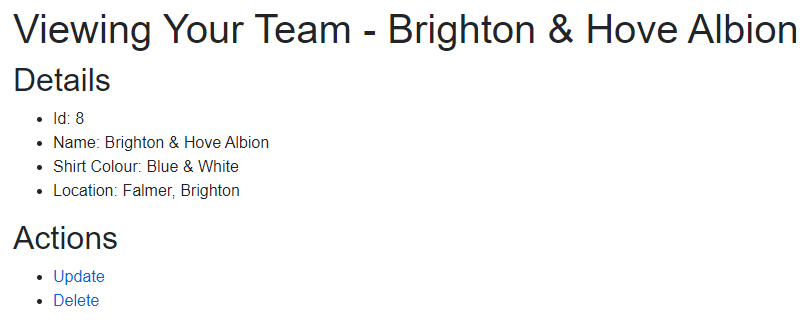
Reading a team in Blazor Wasm using an API
How Easy is it to Update a Record in Blazor Wasm?
As we are using the partial update, it does require a little bit more work. If you want to know the reasons why we are doing a partial update, read my article "ASP.NET Core MVC API: How to Perform a Partial Update using HTTP PATCH Verb".
Firstly, we need to create a new HttpPatchRecord class in our Blazor Wasm application.
// HttpPatchRecord.cs
public class HttpPatchRecord
{
	[JsonPropertyName("op")]
	public string Op { get; set; }

	[JsonPropertyName("path")]
	public string Path { get; set; }

	[JsonPropertyName("value")]
	public string Value { get; set; }
}
This will store the name and value of all the properties we wish to update.
Next, we can go ahead and create our Update.razor Razor component.
It's similar to the Create Razor component, but we need to populate the team in the same way we did for the Read Razor component.
We do that by getting the ID and calling the API to get the team record.
In addition, when we submit the form, we need to populate a list of type HttpPatchRecord. This will contain all the values that we are updating. We will then send that in a PATCH request to our API.
@using System.Net.Http
@using System.Text
@page "/teams/update/{id:int}"
@inject HttpClient httpClient
@inject NavigationManager navigationManager
<h1>Update Team</h1>
@if (Team != null)
{
<form @onsubmit="Submit">
	<label for="Name">Name</label>
	<input type="text" name="Name" @bind="Name" /><br />
	<label for="ShirtColour">Shirt Colour</label>
	<input type="text" name="ShirtColour" @bind="ShirtColour" /><br />
	<label for="Location">Location</label>
	<input type="text" name="Location" @bind="Location" /><br />
	<button type="submit">Update Team</button>
</form>
}
@code {
	[Parameter]
	public virtual int Id { get; set; }

	public virtual Team Team { get; set; }

	public virtual string Name { get; set; }
	public virtual string ShirtColour { get; set; }
	public virtual string Location { get; set; }

	protected override async Task OnParametersSetAsync()
	{
		Team = await httpClient.GetFromJsonAsync<Team>("https://localhost:2001/api/team/" + Id);

		if (Team != null)
		{
			Name = Team.Name;
			ShirtColour = Team.ShirtColour;
			Location = Team.Location;
		}
	}

	public async Task Submit(EventArgs eventArgs)
	{
		var patchObjects = new List<HttpPatchRecord>();
		patchObjects.Add(new HttpPatchRecord { Op = "replace", Path = "/name", Value = Name });
		patchObjects.Add(new HttpPatchRecord { Op = "replace", Path = "/shirtColour", Value = ShirtColour });
		patchObjects.Add(new HttpPatchRecord { Op = "replace", Path = "/location", Value = Location });

		var json = System.Text.Json.JsonSerializer.Serialize(patchObjects);
		var httpContent = new StringContent(json, Encoding.UTF8, "application/json");

		var response = await httpClient.PatchAsync("https://localhost:2001/api/team/" + Id, httpContent);

		if (response.IsSuccessStatusCode)
		{
			var team = await response.Content.ReadFromJsonAsync<Team>();

			navigationManager.NavigateTo("/teams/read/" + team.Id);
		}
	}
}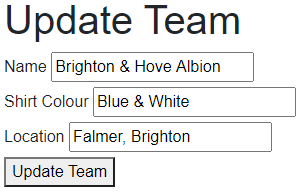
Updating a team in Blazor Wasm using an API
Don't Forget Deleting a Record in Blazor Wasm!
This is pretty simple as we have the principles in place from the other three methods.
We create a Razor component called Delete.razor and create a form HTML element that has a button to delete the record.
When the button is clicked, it submits the form and fires a delete request to the API.
@page "/teams/delete/{id:int}"
@inject HttpClient httpClient
@inject NavigationManager navigationManager
<h1>Delete Team@((Team != null ? " - " + Team.Name : ""))</h1>
@if (Team != null)
{
	<form @onsubmit="DeleteTeam">
		<button type="submit">Delete this Team</button>
	</form>
}
@code {
	[Parameter]
	public virtual int Id { get; set; }

	public virtual Team Team { get; set; }

	protected override async Task OnParametersSetAsync()
	{
		Team = await httpClient.GetFromJsonAsync<Team>("https://localhost:2001/api/team/" + Id);
	}

	public async Task DeleteTeam(EventArgs eventArgs)
	{
		var response = await httpClient.DeleteAsync("https://localhost:2001/api/team/" + Team.Id);

		if (response.IsSuccessStatusCode)
		{
			var team = await response.Content.ReadFromJsonAsync<Team>();

			navigationManager.NavigateTo("/teams/read/" + team.Id);
		}
	}
}
Deleting a team in Blazor Wasm using an API
Watch the Tutorial
You can watch the tutorial where we use an ASP.NET Core MVC API and Blazor Wasm to produce CRUD modules with integrating with the API.
We do an example where we create, read, update and delete through a Blazor Wasm application.
In addition, we also show you how you can run both the API and the Blazor Wasm application simultaneously in Visual Studio. You will need this to happen if you want it to work!
Where next for API Integration?
Now that you've got the hang of writing and integrating API endpoints for Blazor Wasm, you've probably got a lot of the foundations in place. I suspect that the fast majority of your endpoints are going to be CRUD related.
From here, you can set up API integration to run a report. Or maybe you want to set up API integration to import an Excel file?
This tutorial should give you the driving seat to produce the web application you want in Blazor Wasm.
Related tutorials
Blazor Server vs. Blazor WebAssembly: Four ways in which they differ
Blazor Server versus WebAssembly (Wasm). Four ways on how the Blazor hosting models differ, including performance & offline support.