- Home
- .NET tutorials
- How to create the Connect 4 game in Blazor WebAssembly in one hour!
How to create the Connect 4 game in Blazor WebAssembly in one hour!
Published: Saturday 29 May 2021
We did another live coding challenge on YouTube, and our aim was to create Connect 4 with the Blazor WebAssembly framework.
But, there was a catch. We only had one hour to do it!
As well as a playable game, we also wanted the ability to reset the game and keep a scoreboard.
We will talk through how we went about building the web application and share the code used.
In addition, watch our live stream where we successfully completed our challenge using C# and Razor components.
How does Connect 4 work?
Connect 4 is where there are two players, where one player is red and the other is yellow. Each player takes alternate turns, and drops their coloured disks into a 7 column by 6 row suspended grid.
When the player takes their turn, their disk will fall into the lowest unoccupied space in the column.
The aim of the game is for a player to get four of their pieces in a row. This can be done either horizontally, vertically, or diagonally.
In the example below, the yellow player has won by getting four yellow disks vertically in the centre column.
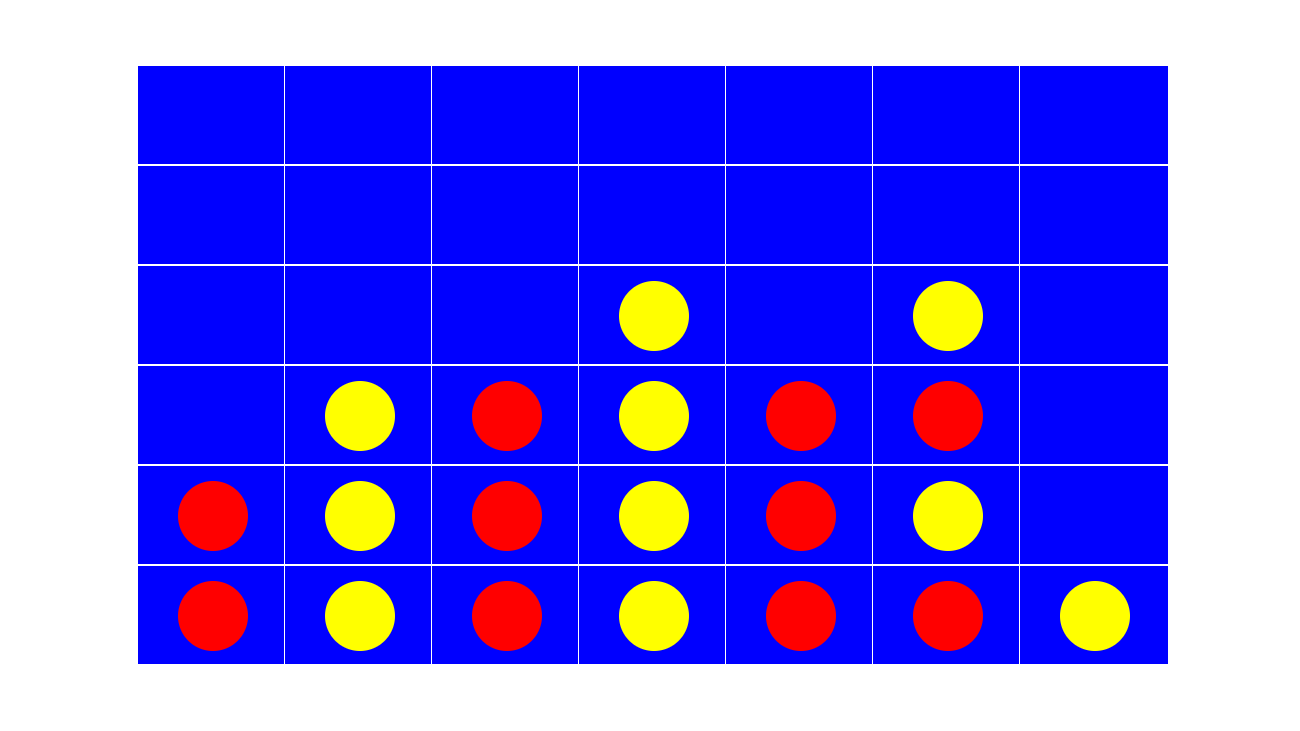
Connect 4 game built using Blazor WebAssembly
The classes
We decided to create a class and an enum.
The first was a PieceEnum enum. This would represent each player piece (or disc) on the grid, with 'Yellow' represented with an index of 0, and 'Red' represented with an index of 1.
// PieceEnum.cs
public enum PieceEnum
{
	Yellow,
	Red
}
The Grid model
The Grid model holds the background functionality to make Connect 4 work.
The first property is Pieces. The Pieces instance is a two-dimensional array that holds all the different spaces on the grid. The first dimension represents the columns, and the second represents the rows. This array stores the different pieces using an instance of nullable PieceEnum.
This gets created when the Grid model is initialised, and when the game is reset.
In-addition, we also have a couple of other PieceEnum instances. NextTurn is the first, which defines which colour is about to take their turn. Winner is the other, which determines which colour has won the game.
Finally for properties, we have a Red and Yellow property which keeps track on how many games each colour has won. We also have a Boolean property to dictate whether it's a drawn game.
In-terms of methods, we have a ResetGame, SetNextTurn and GetWinner method.
The SetNextTurn method will determine if there is a winner by calling the GetWinner method. Assuming there isn't, it will update the NextTurn property with the opposite colour.
The GetWinner method will go through and check each grid space to see if there are four of the same colour in a row. This can happen horizontally, vertically, or diagonally.
When the ResetGame method is called, it will create a new instance of our Pieces array and reset the winner.
// Grid.cs
public class Grid
{
	const int COLS = 7;
	const int ROWS = 6;

	public PieceEnum?[,] Pieces { get; protected set; }

	public PieceEnum NextTurn { get; protected set; }

	public PieceEnum? Winner { get; protected set; }

	public int Red { get; set; }

	public int Yellow { get; set; }

	public bool Draw { get; set; }

	public Grid()
	{
		NextTurn = PieceEnum.Red;

		ResetGame();
	}

	public void ResetGame()
	{
		Pieces = new PieceEnum?[COLS, ROWS];
		Draw = false;

		if (!Winner.HasValue)
		{
			NextTurn = (NextTurn == PieceEnum.Red ? PieceEnum.Yellow : PieceEnum.Red);
		}
		else
		{
			NextTurn = Winner.Value;
		}

		Winner = null;
	}

	public void SetNextTurn()
	{
		Winner = GetWinner();

		if (!Winner.HasValue)
		{
			if (NextTurn == PieceEnum.Red)
			{
				NextTurn = PieceEnum.Yellow;
			}
			else
			{
				NextTurn = PieceEnum.Red;
			}
		}
		else
		{
			switch (Winner.Value)
			{
				case PieceEnum.Red:
					Red += 1;
					break;
				case PieceEnum.Yellow:
					Yellow += 1;
					break;
			}
		}
	}

	public class CheckIndex
	{
		public int Column { get; }

		public int Row { get; }


		public CheckIndex(int column, int row)
		{
			Column = column;
			Row = row;
		}
	}


	public PieceEnum? GetWinner()
	{
		PieceEnum? Winner = null;

		for (var column = 0; column <= Pieces.GetUpperBound(0); column++)
		{
			for (var row = 0; row <= Pieces.GetUpperBound(1); row++)
			{
				// Check horizontally
				Winner = CheckGroup(column, row, (column, row, checkIndex) => new CheckIndex(column + checkIndex, row));

				if (Winner.HasValue)
				{
					return Winner;
				}

				// Check vertically
				Winner = CheckGroup(column, row, (column, row, checkIndex) => new CheckIndex(column, row + checkIndex));

				if (Winner.HasValue)
				{
					return Winner;
				}

				// Check diagnonal
				Winner = CheckGroup(column, row, (column, row, checkIndex) => new CheckIndex(column + checkIndex, row + checkIndex));

				if (Winner.HasValue)
				{
					return Winner;
				}

				// Check diagnonal
				Winner = CheckGroup(column, row, (column, row, checkIndex) => new CheckIndex(column - checkIndex, row + checkIndex));

				if (Winner.HasValue)
				{
					return Winner;
				}
			}
		}

		return null;
	}

	private PieceEnum? CheckGroup(int column, int row, Func<int, int, int, CheckIndex> check)
	{
		PieceEnum? lastCheck = null;
		for (var checkIndex = 0; checkIndex <= 3; checkIndex++)
		{
			var checkRowColIndex = check?.Invoke(column, row, checkIndex);

			if (checkRowColIndex == null)
			{
				return null;
			}

			if (checkRowColIndex.Column < Pieces.GetLowerBound(0) || checkRowColIndex.Column > Pieces.GetUpperBound(0)
				|| checkRowColIndex.Row < Pieces.GetLowerBound(1) || checkRowColIndex.Row > Pieces.GetUpperBound(1)

				)
			{
				return null;
			}

			var thisCheck = Pieces[checkRowColIndex.Column, checkRowColIndex.Row];

			if (thisCheck == null || (checkIndex > 0 && lastCheck != thisCheck))
			{
				return null;
			}
			lastCheck = thisCheck;
		}

		return lastCheck;
	}
}
Creating Razor components in Blazor
We had to go ahead and create two Razor components in our Blazor application to make it work.
The space component
The space component represents each space on the grid. For this component to function, a nullable PieceEnum instance has to be passed in as a parameter.
From here, we check and see if the nullable PieceEnum instance has a value assigned to it.
If it does, we create a div class, with the class name determining whether it's a red or yellow circle that we display. We then add CSS to style the piece as a coloured disc.
<!-- SpaceComponent.razor -->
@using RoundTheCode.Connect4.Models
<div class="space">
	@if (Piece.HasValue)
	{
		<div class="piece-@Piece.Value.ToString().ToLower()"></div>
	}
</div>
@code {
	[Parameter]
	public PieceEnum? Piece { get; set; }
}
/* SpaceComponent.razor.css */
.space {
width: 150px;
height: 100px;
background-color: blue;
border: 1px white solid;
padding: 15px 40px;
}
.piece-red {
background-color:red;
border-radius: 50%;
width: 70px;
height: 70px;
}
.piece-yellow {
background-color: yellow;
border-radius: 50%;
width: 70px;
height: 70px;
}The grid
Finally, a GridComponent Razor component was created. This would be the main root of the application.
For this to function, a Grid instance is created when it's initialised. The Razor component displays an empty 7-column by 6-row grid, where each column is clickable. The SpaceComponent is displayed for each square on the grid, and this is populated using the Pieces array from our Grid instance. Each value in the Pieces array is passed through as a parameter to the SpaceComponent.
When a column is clicked, it calls a handle which determines which column index has been clicked, and occupies the first unoccupied row of that column. Subsequently, it updates our Pieces array from our Grid instance.
Finally, we displayed a scoreboard and created a Reset button. With the reset button, it calls the ResetGame method in the Grid model instance, which clears the squares and decides which player gets to go first in the next game.
<!-- GridComponent.razor -->
@using RoundTheCode.Connect4.Models
@page "/"
@if (Grid != null) {
<div class="layout">
	<div class="message">
		<strong>Red @Grid.Red-@Grid.Yellow Yellow</strong><br />
		@if (Grid?.Winner.HasValue ?? false)
		{
			@(Grid.Winner.Value  + " has won the game")
		}
		@if (Grid?.Draw ?? false)
		{
			@("The game is a draw")
		}
		<button @onclick="@(e => ResetGame(e))">Reset game</button>@Grid.NextTurn's turn is next.
	</div>
	<div class="grid">

			@for (var col = Grid.Pieces.GetLowerBound(0); col <= Grid.Pieces.GetUpperBound(0); col++)
			{
				var c = col;
				<div class="column" @onclick="@(e => ColumnClick(e, c))">
					@for (var row = Grid.Pieces.GetUpperBound(1); row >= Grid.Pieces.GetLowerBound(0); row--)
					{
						<SpaceComponent Piece="@Grid.Pieces[col, row]"></SpaceComponent>
					}
				</div>
			}

	</div>
</div>
}
@code {

	public Grid Grid { get; set; }

	protected override Task OnInitializedAsync()
	{
		Grid = new Grid();

		return base.OnInitializedAsync();
	}

	public void ColumnClick(MouseEventArgs eventArgs, int col)
	{
		if (Grid.Winner.HasValue)
		{
			return;
		}

		for (var row = Grid.Pieces.GetLowerBound(1); row <= Grid.Pieces.GetUpperBound(1); row++)
		{
			if (!Grid.Pieces[col, row].HasValue)
			{
				Grid.Pieces[col, row] = Grid.NextTurn;

				Grid.SetNextTurn();
				break;
			}

			Grid.Draw = true;
		}
	}

	public void ResetGame(MouseEventArgs mouseEventArgs)
	{
		Grid.ResetGame();
	}

}
/* GridComponent.razor.css */
.layout {
margin-left: auto;
margin-right: auto;
width: 1050px;
}
.message {
height: 100px;
}
.grid {
height: 700px;
}
.column {
width: 14%;
float: left;
}The final result
We got the application working and here is how the final result looked:

Connect 4 game built using Blazor WebAssembly
If you wish to try it out for yourselves, download the code example for this Blazor demo and try out the application on your machine.
Related tutorials
Create a Roulette wheel. Game development using Blazor WebAssembly
Use Blazor WebAssembly to create a roulette wheel in one hour! Follow our Blazor Wasm game development tutorial using C#.